Tuesday, September 13, 2016

Playroom Twine & Clothespin Banner


Having a playroom in our new house has been a dream! It keeps all of Bennett's toys organized [without cluttering his bedroom and our living room like they did in our old house], but also provides a great, safe place for him to play. One of the things I wanted to do in his playroom to give it a more playroom feel is to create and hang a banner to be able to clip little flashcards with the alphabet, numbers, colors, animals - and then to one day have a space to hang little projects and artwork that he'll create. There are huge empty walls in the playroom, so I loved creating something so cute while also functional to dress up one of the walls with. I had the twine and clothes pins already and scored these alphabet cards from the dollar section of Target a few months ago. It took about 5 minutes to throw together (thank you Mom for your help!) and I love the way it looks in his playroom. 


Materials you'll need:
- Twine
- Wood clothes pins
- 4 thumb tacks 
- Scissors
- Things to hang our your pins :)

We cut our two large pieces of twine and thumb tacked them to the wall. I knew that I wanted to hang flashcards first, so I actually laid out the flash cards on the floor, in front of the shelf that I wanted to hang the banners above, to make sure that I was cutting my pieces long enough.

Once they were on the wall, I made bows (as you can see in the close up picture) to tie on the ends to hide the thumb tacks on the wall. 


That's it! So for a project that literally cost a few dollars, if you're counting all of the supplies that I already had, it was a quick and easy project to do to spruce up a boring wall in the playroom and to soon start using to teach Bennett his letters, numbers, colors and animals!


PS - Can you tell that I was two pins short? Haha, until I can steal two from my mom's clothesline at home, two chip clips will do it for now! :)

Sunday, September 11, 2016

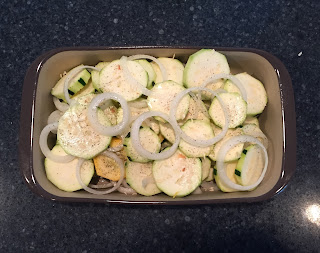
Baked Squash, Zucchini & Onion


This dish was a fun one to make because the squash and zucchini came from our new garden! :) This one is a simple and healthy side to serve along with your summer main course. Hope you enjoy!


Ingredients:

- 2 Squash
- 2 Zucchini
- 1 Onion
- Onion Flakes
- Salt & Pepper
- Old Bay
- Lemon Juice


Instructions:

  1. Wash, peel and slice the squash, zucchini and onion.
  2. In a baking dish, you'll want to layer each of the ingredients. I did a row of zucchini, a row of squash and then a row of onion. On top of the three layers, I drizzled a little lemon juice and did a light seasoning of onion flakes, old bay, salt and pepper. After, I did another row of zucchini, squash, onion and seasonings until I used all of my squash and zucchini.
  3. When done, bake at 350 degrees for 30 minutes. You won't need add any water or oil because the squash and zucchini will release juices while baking (thank you for that tip, Dad!)


Sunday, September 4, 2016

Easy Dinner: Garlic Shrimp Pasta


This dish is such an easy and quick dinner option - Eric and I had it tonight and it was simple, yet delicious! My friend took me to this awesome little local pasta shop this past weekend that makes a ton of different flavored pasta noodles. I picked up Old Bay shells for Eric and I to try, and Sweet Potato noodles for Bennett (he's recently become obsessed with sweet potatoes). I seriously can't wait to go back - all of the options with different herbs and seasonings - we could make a million different dishes with everything available to choose from! 

I found a version of this recipe online - I'm usually a little hesitant when trying scampis because they always seem to be made with way too much oil or butter. After making this recipe and tailoring it a little, it was light and perfect! The Old Bay noodles made the dish even more spicy, 
which I love!

Ingredients:
- 1 lb shrimp, deveined
- 1/2 lb spagehetti noodles
- 6 to 8 garlic cloves, minced
- 1/4 cup butter
- Olive oil (3 drizzles)
- Fresh ground pepper
- Red pepper flakes
- Italian seasoning

Instructions:
  1. Boil the noodles. When finished, drain and set aside.
  2. Wash and peel your shrimp.
  3. Melt butter over medium heat and add in shrimp. Cook until the shrimp are a little pink and starting to curl.
  4. Add garlic and oil. Continue to stir until the shrimp are completely cooked.
  5. Add your pasta to the skillet, with fresh ground pepper, red pepper flakes and Italian seasoning. 
  6. You'll want to make sure there's just enough juice in the dish (you don't want to dish too dry, but you also don't want it swimming). If the dish is too try, you can add additional olive oil or a little bit of water. You can also keep a little water from the pot you boiled your noodles in, to use for this too.
  7. Keep tossing all of the ingredients in the skillet and when it's hot enough, enjoy! :)
- - - -

Here's a photo of some of the many options of pasta from the local shop - 
it was the cutest place!